Sunday, May 29, 2011


>>NOTE: The image above is not mine<<
Hang this in your room or give some 
to your friends as gifts ^u^

>>What you'll need:<<
Paper (to draw on)

Scissors

Thread or yarn

Coloring Materials

Decorative Materials (optional)

Puncher

>>Procedure:<<
(1.) Draw butterflies on a piece of paper,draw it
large enough then color it with your coloring materials.

(2.) You can put decor in it. Punch holes at the top & bottom
part of the butterflies.

(3.) Thread yarn on one butterfly to another. 


(4.) You can insert beads,etc. in the yarn to make 
it colorful. Make sure to tie 
each end so that the beads won't fall if you hang
them in the room.

(5.)Your butterfly is now ready to use as decoration or gift~!

"Click Home"
|
|
V


Sack Sticker Grab Bags
The image above isn't mine.
Use stickers for projects, scrap booking, & many more..
Make stickers your way <(' u '<)...

What you'll need:
>>If drawn by hand:<<
Sticker Paper ( any color )

Something to draw on
 like paper

Coloring Materials

Drawing Materials

Scissors

Glue

----optional:----
Glitters,etc.

Newspaper

Cardboard
>>If drawn on computer (digitally)<<
Sticker Paper

Printer 

An application to where you can
draw your sticker like Photoshop, etc.

Paper (printing)

Scissors

Glue

----optional:----
Glitters,etc.

Newspaper

Cardboard


Procedure:
>>If drawn by hand<<
(1.) Draw your sticker on your paper, color it if you like

(2.) Cut it out, then put glue on the back. Don't put to
much glue, just pour in a small drops of glue on the sides then
spread it.

(3.) Place the cutout gently on your sticker paper
, flatten it with your hand.
(If you want you can put glitters in it, make sure you place 
a newspaper below it so it won't be messy.)

(4.) Cut out your drawing with the sticker paper sticked on its
back with scissor, cutter,etc.

(5.) Carefully peel the sticker off, your sticker is now ready to
use for decor~!

>>If drawn on computer (digitally)<<
(1.) First thing you need to do is to open Photoshop,
any other application to where you can draw,
or you can draw online.

(2.) Start drawing your sticker, then print it out...

(3.) Cut the drawing out, then put glue on the back. Don't put to
much glue, just pour in a small drops of glue on the sides then
spread it.

(4.) Place the cutout gently on your sticker paper
, flatten it with your hand.
(If you want you can put glitters in it, make sure you place 
a newspaper below it so it won't be messy.)

(5.) Cut out your drawing with the sticker paper sticked on its
back with scissor, cutter,etc.

(6.) Carefully peel the sticker off, your sticker is now ready to
use for decor~!


------>>Optional:<<-----

If you want, before you peel the sticker off...
You can paste the sticker again on a piece of
cardboard, to make it look like the ones we 
buy in stores...decorate it then....Keep on putting
stickers on the cardboard until it's full.

+*,~Enjoy!^u^~*,+


"Click Home"
|
|
V

Saturday, May 28, 2011


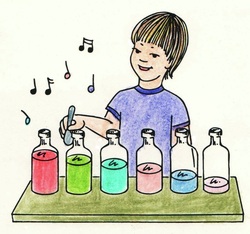
The image above isn't mine....
If you don't have a xylophone or lyre....
Why not make your own out of jars or 
bottles ? I have read an ecofact
about recycling glass jars in my book, it said:
Recycling just one glass bottle saves enough
energy to run a computer for 25 minutes or a
TV for 90 minutes. Glass made from new materials 
creates more water pollution than glass made from
recycled ingredients. So making this project/ experiment
helps save money (or maybe it cost a little)
& is eco-friendly >w<

>>What you'll need:<<

Glass bottles or jars (it's better if all of them are
in the same size)

Food coloring/ Paint (watercolor) (optional)

Water


Spoon

>>Procedure:<<

1.) Pour the water in each jar/ bottle carefully, make 
sure all of them have different amounts of water

2.) Pour in different food coloring/ paint to each jar/ bottle,
be careful or you might get stained, this will help you remember
which jar is which....Or you can label it with numbers, letters, etc.

3.)Tap each glass with the spoon, Notice that each bottle has 
a different tone or you can blow into them instead..
The more jars you have, the more tones you'll get!

Have fun making music~!


"Click Home''
|
|
V


The image above isn't mine
-What's better? Pancakes or Waffles? My answer:
I dunno, I thought: "Is there a difference between Pancakes
& Waffles?"...Yes~! The waffles have those square-
thingys in them while  pancakes is flat....That's not only the 
answer LOL... The Maple Syrup, which tastes great with 
pancakes, I said to be a....Tree Sap, that's
from a maple tree, mostly found in the Canadian Region..
Another Fact: Long time ago, before baking soda was
invented, cooks often used fallen snow, as a secret
ingredient which contained ammonia, that made pancakes 
nice and soft.


"Click Home"
|
|
V

Friday, May 27, 2011

Make Chocolate
The image above isn't mine
>>How to make chocolate<<
I love Chocolate~! One of the most popular & tastiest foods
in the whole world >w<...Chocolate is a valuable energy source.
A piece of chocolate chip can give enough energy for an adult
to walk 150 feet O.O....Chocolate contains a chemical, called
"flavenoids" & these flavenoids have nutrition in them. But most of the
chocolate we eat are processed. Many unhealthy chemicals & sugar
are added to it. In some cases, this cancels the benefits of the flavenoids.
This is where chocolate is termed as "unhealthy" :<. Pure dark chocolate
is healthy though, we get a lot of nutritious stuff from it...Chocolate is said
to lower blood pressure  >w<....


Enjoy your chocolate~!! :]


"Click Home"
|
|
V

June is almost here...Here are some D.I.Y. School Supplies
that'll help you save money & is eco-friendly (some of 'em) >w<..
Or maybe it cost a little :3
NOTE: The images below aren't mine.
>>Kawaii Crayons!<<
- Turn your small pieces and chucked up crayons into
Colorful Rainbow-like crayons! ^u^

>>Color Pastels<<
-Create cute pictures & artworks with these homemade 
color pastel!

>>Clay<< 
-You may this in your Arts & Crafts subject, etc.
Learn how to make 4 kinds of molding clay
Another tutorial:

>>Watercolors<<
- Cute set of watercolor paint that you can make
with all the colors you want & need...


>>Poster Paint<<
- If you don't want watercolor paint, then try Poster Paint!
I found 2 tutorials, pick one that costs more less for you.


>>Hand Sanitizer<<
- Always maintain the cleanliness of hands with this
homemade hand sanitizer!
**How to make them**
It's easy and economical to make your own hand sanitizer.

>>Notebooks<<
-This is just how I wanted to make my school notebooks for the
next school year! Very unique notebooks.. :)
**How to make them**


>>Pencilcase<<
-Sew in your own Pencilcase that's full of colors x''3
**How to make one**


>>Backpack<<
-Use your old bag if it's still okay to use....
or..
sew your own CUTE backpack!
**How to make them**
Make a Backpack Bag


>>Paper<<
-Turn your old newspapers into...
recycled papers for you to write/draw on..
**How to make them**


>>Bath Powder<<
- I thought maybe this may come in handy... At
P.E. time, etc...You may use this after..
>>How to make them<<


>>Glue/ Paste<<
Glue comes in pretty handy in your
Arts & Crafts subject, etc.
11 Recipes for Homemade Glue
>>How to make them<<


Happy Crafting!
>>Hope I helped you..=w=<<


"Click Home"
|
|
V

Thursday, May 26, 2011

>>Downloads:<<
*brushes:*
Splats & Strokes Photoshop by
kabukitkatze in deviantart
>>Download ps brush set here<<


I always use this kind of text effect when making headers
for my blog, now I'm gonna teach you how to do it :3

First thing need to do is open Adobe Photoshop >w<
...then do the following steps:
>>Go to File>New...fill in the height, width, etc...then click OK
(Make sure you make the background contents
 transparent & its color mode in RGB Color [as always >:3])


(1.) Select your type tool...


(2.) Change your font, font style & font size...


(3.) Start typing xD
(4.) Right click on your text's layer
(5.) Click Create Work Path


(6.) Create a new layer
(7.) Delete your text's layer


(8.) The text's work path still stays, right click on the pen tool icon
then click Add Anchor Point Tool
(9.) Right click on your work path, then click Make Selection,


(10.) This window will appear, Feather Radius: 0 pixels,
Anti-aliased checked..


(11.) The work path will turn into broken lines, that means it's selected


(12.) Select the Paint Bucket Tool, Choose a color from your swatches, etc.
(13.) Fill in the selected area


(14.) Choose a another color from your swatches
(15.) Grab your brush tool, you can either change your brush or not.
(16.) Start designing your text, to whatever you like..
But I design mine using Paint Splatter Brushes
You can download the Paint Splatter Brush Set 
from the given download link at the 
"download" section at the top most part of this 
post.


(17.) Keep on designing it until you feel comfortable about
what it looks. Grab your "Selection Tool"> Right click on your selected
area> Click Deselect


(18.) Right click on your text's layer (layer 1)> Click Blending Options


(20.) (I skipped number 19. lol..) This window will appear,
Click on the word "Stroke", not the box beside it. Adjust its size if you want &
change its color...Position: Outside, Blend Mode: Normal,
Opacity: 100% (as always) & fill type: color> then click OK


(21.)Right click on your text's layer (layer 1)> click "Duplicate Layer"
>Click OK

(22.) Your text's layer (layer 1) will now have a copy, 
"layer 1 copy", place it below layer 1. Right Click on your text layer's  copy
(Layer 1 copy)
(23.) Click Blending Options


(24.) Now this window will appear, this time Double 
its size, example, your original text's layer's (which is layer 1)
stroke size is 3 px, then in your text's layer's copy,
its stroke size must be 6px. Choose a different color while
the Position, Blend Mode, Opacity & Fill Mode stays the same.


(25.) This will become the result.........In the next tutorial,
I'll show you how to add more effect on your text :3..

Tutorial 2: *COMING SOON*

>>Hope I helped >w<<<

or
"Click Home"
|
|
V

Wednesday, May 25, 2011

I got my chatbox from "Cbox"...And
I now figured out how to change the smileys!
(Step 5-6)

1.)First of all, If you haven't yet signed up in cbox, 
then go sign up first...

2.) After they'll tell you that your Cbox has been created.
Now log in to Cbox.

3.) You will now be directed to your new cbox control panel

4.) If you want to edit your cbox, hover your mouse to "Look & Feel''
a drop-down menu will appear automatically. Choose what will
you edit first.

5.) If you want to skip that part & want to start by changes the
smileys,then hover your mouse to ''Options'' then click
"Smileys"

6.)Now this page will appear, You can start by changing it's code,
alt code....now, for the URL...this is the url/ link of the smiley's image..
you can change the URL too..thats the best part xD You can also
add a new row if you want more smileys :)
>>NOTE: I got some of my smileys from toradora.org
I copied their Image Urls LOL..Is Taiga there too? xD<<

Enjoy your new cbox ^_^
(Sorry if my english isn't that good, I really have to
read my dictionary/thesaurus more ^^U)

"Click Home"
|
|
V

Tuesday, May 24, 2011


>>The photo above isn't mine<<
I use to make this project when I was still young, the project is called  "color etching" :3
,Perfect Arts project for toddlers & above...
I also use this kind of art when making cards for certain events >:3
It's so colorful & fun x''3

How to make it:

1.) Get any piece of paper & color the whole paper with any design
you like, it's up to you, but I prefer coloring it like a rainbow 
to make it more colorful, make sure you color it heavily,that
way, the richer the color can be seen through.Make sure you fill the
whole paper up.

2.) Secondly,Cover the colors up with black color, color it
with black crayon & make sure you color it heavily,
Make sure the colors at the bottom cannot be seen

3.) Now you may now draw on it with pencil & 
ballpen with no more ink. You may also use any 
pointy stuff like toothpicks but be careful
with it.


Enjoy!


"Click Home"
|
|
V

>Circle around my blog and enjoy reading my posts...^u^
Please share this blog!<


(I red this from Total girl mag April 2011
& I would like to share to you,again :3..)
Right click then click open link in new
tab to see the image above in full size

Looks sweet? Here's how to make it:

Cooking time: 30 mins.
Difficulty:  
You'll need:
240g block of white chocolate,
roughly chopped 

100g bag of natural-flavor
microwave popcorn

1 cup of rainbow marshmallows

Colored candy sprinkles

Egg molds

Cling wrap

Procedure:
1.)Melt the chocolate (make sure you ask 
mom or dad to help you) by placing it in
a medium heatproof bowl over a saucepan.

2.) Grease the inside of each half-egg mold
and line it each with a double layer of cling wrap 
that extends at least 4 cm over the mold.

3.) Scoop 2 tablespoons of melted chocolate
into each mold and spread the chocolate over
the entire inside surface with the back of a
spoon. Freeze on a flat surface for 15 minutes
or until chocolate has set.

4.) Place 3 cups of freshly popped popcorn
in a large bowl then add marshmallows and the
remaining chocolate and mix until popcorn
& marshmallows bakes are coated in chocolate

5.) Scoop mixture into chocolate molds and
pile high. Add sprinkles & allow the eggs
to set in the fridge overnight. Remove eggs from
molds and peel off cling wrap then decorate!

You can copy this or print it..

Enjoy eating your sweet easter treat! :3

"Click Home"
|
|
V

>Circle around my blog and enjoy reading my posts...^u^
Please share this blog!<

Other than making a double choco ice cream,
Why not make a mango shake in this hot
day? Here's how to make one!
(Yes, I got this from Wikihow..just want to
share ^u^)

What you'll need:
For 2-3 glasses of
mango shake

Hand blender/
Milk shake blender

❒ Mangoes-2 pieces

Sugar-4 tsp

Milk-2 glass

Nuts-(cashews to top up)

Procedure:

1.)Take the two mangoes and peel them off. extract the pulp of mangoes and keep aside.


  • 2.)Now take a blender and blend the pulp til it becomes smooth.

    3.)Add the sugar (4 tsp or to taste) to the pulp and blend it again for a minute

    4.)Now add the milk portion to the mix and blend it well, the mango shake is ready

    5.)For the topping you can use ice-cream also you can crush some cashews and add the the milk shake.


  • 6.)Pour the Mango Shake in the glass, sprinkle some small pieces of cashews and a scoop of vanilla ice cream on the top. And it is ready to serve.


  • Enjoy your sweet...sweet...MANGO SHAKE!
    Gimme!GIMME!..joke!
    As always, you can copy..or print! :D

    "Click Home"
    |
    |
    V